So for a long time I've wanted to make a Half-Life costume. Originally, I wanted to do Gordon Freeman, and I even got so far as printing out the giant pepakura model and started gluing a bunch of cut-out polygons together. But life wound up making me put that project to rest when I moved to a small apartment with my (then) girlfriend (who is now my wife) and space was simply not available. Now that we have a house together and I have room to do extensive costuming, I'm back in business! So what do I do? A Half-Life costume! But I've seen some Gordon Freeman costumes online and, honestly, not many impressed me. Also, I'm losing my hair a bit and nobody wants to see a balding Gordon.
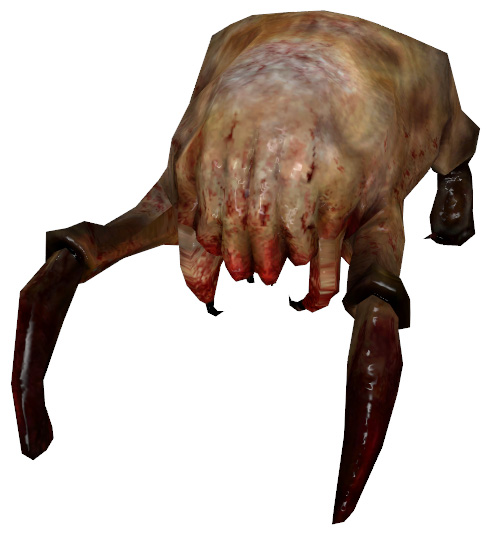 |
| Figure 1 - a headcrab |
So I opted for another iconic Half-Life costume: the Headcrab Zombie.
For those who don't know, headcrabs are small annoying quadrupedal parasites whose bodies consist of a big udnerbelly mouth and no eyes. These little buggers walk around and lunge at you, with the idea being that they swallow your head and (through some implicated cranial penetration) bend you to their will. Both headcrabs and the sad sods whose minds they've taken over (hereafter referred to as headcrab zombies) are enemies in the Half-Life series of games.
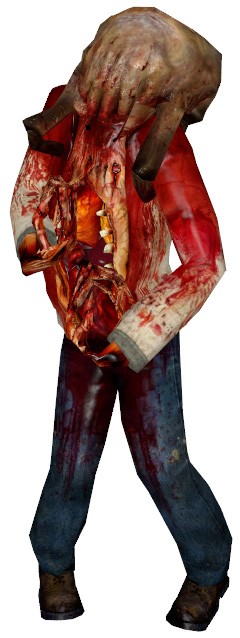 |
| Figure 2 - a headcrab zombie |
I decided on this costume about mid-September and began hurriedly thinking of ways to accomplish this. There are some big challenges, and some small challenges. Right off the bat, the major components are:
- headcrab mask/helmet
- lab coat (in Half-Life 1, they were scientists)
- finger tendrils
- eviscerated cavity
- lots of blood
As noted above, in Half-Life 1, the victims were formerly scientists at the Black Mesa research facility. In Half-Life2, they were just civilians in civilian-issue clothes. I opted for the former, so I required a lab coat. That's easy enough to find and acquire, though. The fingers are elongated and usually blackened, so a simple gloved solution presents itself. I'm forgoing the eviscerated torso in the interest of time, because the headcrab itself will likely be fairly time-consuming.
It took me a fair while to decide how I was going to approach the headcrab and what I ultimately wanted to use for its construction. I refused to use the headcrab hat that Valve sells, as that seems to simple a cop-out. I had to create it myself. I considered sewing a plushie together, perhaps with some kind of gloss to it so that it was squishy yet had a sheen like some kind of organic, but I ultimately settled on something more solid.
Having seen it done in other admirable props, I decided to make the plunge and go foam / fiberglass for the first time. Being brand new to this method, I was actually quite unaware of what a pain in the ass fiberglass can be to work with. But, I researched a few things and forged ahead. One crucial detail I learned the hard way, however, was that fiberglass resin acts as a solvent for foam. Fortunately for me, this was a good project on which to learn this lesson, because the added bumpiness makes it looks better, in my opinion. Anyways, on with the show.
I knew I wanted to have the whole thing mounted on a flip-up face protection visor, so I went out and purchased one of those at Home Depot. Next, my wife had some old modeling wire mesh that I glued to the visor just to get a base for the foam.
 Once that was in place, I sprayed a whole can of spray-foam insulation around it in the general shape of the headcrab body.
 Following this, I just used an old kitchen knife (now no longer used for food) and shaped it.


However, I was displeased with how the front legs joined to the body, so I used some MORE spray-foam insulation and shaped those out. Then I carved the mandible teeth things in the front and began adding fiberglass strips.


It took me a fair while to decide how I was going to approach the headcrab and what I ultimately wanted to use for its construction. I refused to use the headcrab hat that Valve sells, as that seems to simple a cop-out. I had to create it myself. I considered sewing a plushie together, perhaps with some kind of gloss to it so that it was squishy yet had a sheen like some kind of organic, but I ultimately settled on something more solid.
Having seen it done in other admirable props, I decided to make the plunge and go foam / fiberglass for the first time. Being brand new to this method, I was actually quite unaware of what a pain in the ass fiberglass can be to work with. But, I researched a few things and forged ahead. One crucial detail I learned the hard way, however, was that fiberglass resin acts as a solvent for foam. Fortunately for me, this was a good project on which to learn this lesson, because the added bumpiness makes it looks better, in my opinion. Anyways, on with the show.
I knew I wanted to have the whole thing mounted on a flip-up face protection visor, so I went out and purchased one of those at Home Depot. Next, my wife had some old modeling wire mesh that I glued to the visor just to get a base for the foam.


Some filling of gaps and reshaping later, I wound up with what I felt was a good shape for the torso.

I struggled with a good cheap way to do the legs, and ultimately stumbled across some old rigid electrical conduit in my basement. I cut them to size and used some Crayola Model Magic to form joints and claws.


After the whole thing was covered in a layer of fiberglass (except for the legs, those are getting done after the body is complete), parts were just no good and needed to be sanded and fixed. Additionally, I wanted at least an extra layer for structural support, especially for the leg connections. So I had to clip off a bunch of stray strands and layers, and then sand it all down. You can see my workshop on the pile of carpet pad in the garage (good thing to use as a dropcloth for fiberglass resin drippings).

Clipped, unsanded

And now sanded


Again, obviously there is some topical turbulence due to the resin dissolving the foam a little bit. Also, there are some glaring holes in the fiberglass that will need to be re-layered.


Another layer of fiberglass...


Sanded and then primed to show me what spots I've missed


And sanded, showing detail of spots that need to be cleaned up


Now with a ton of Bondo applied to smooth out the fiberglass cloth texture, as well as to fill lots of divots...

And with the front claws finally added. Ready to be painted...
I painted the headcrab somewhat, but noticed that there were glaring holes that needed to be filled in. So I've done that, and will resand / repaint.
All painted, and as complete as I'm gonna get it. Once I wear it at the party, I and it will be splattered with fake blood.
Wow. This is pretty amazing. Well done :)
ReplyDeleteI am thinking about making this as it would not just be an awesome costume, but also make for a cool decoration.
I have two questions though:
1. What did you do for sight? Did you just make two small holes or was the helmet not so big that when you wore it, your eyes were right under the bottom of the helmet?
2. Did it smell? I mean, if youre wearing it for a night the last thing you'd want is to get light headed because of fumes or what not.
Cheers
Guro, UK
Hi!
ReplyDeleteThanks for your comment!
As for sight, there was none. It serves more as a prop than an actual costume piece. I used a painter's mask as a base so that I could easily flip it up, but the sheer weight of the thing made that fairly useless.
There was not much smell after everything cured appropriately. Also, I let it air out quite a bit in the garage for a few days at least.
Again, thanks for your compliments.
Thank for the help I have made one for the 2014 zombie walk here in Canada
ReplyDeletelloyd
Dude that's really smart unlike me wanting to get the headcrab hat that barely fits on your head I really wanted one to cover my entire head then I found this it looks pretty kinda hard to make buy ill try so thanks!
ReplyDelete